Installing a new flat roof is a significant investment that can enhance your property's value, improve energy efficiency, and provide decades of reliable weather protection. Whether you're building an extension, replacing an aging roof, or adding a garage, understanding the flat roof installation process helps you make informed decisions about materials, costs, and whether to hire professionals or attempt a DIY approach.
At Knights Roofing, we've installed hundreds of flat roofs across South West London over the past 20+ years. In this comprehensive guide, we'll walk you through everything you need to know about flat roof installation in 2025, from choosing materials and understanding costs to comparing professional installation with DIY approaches.
Is DIY Flat Roof Installation Right for You?
Before diving into the installation process, it's crucial to assess whether DIY flat roof installation is appropriate for your project. While DIY roofing kits have become more accessible, flat roofing is a skilled trade that requires specific knowledge, tools, and experience.
When DIY Might Work
DIY flat roof installation can be viable for:
- Small, simple structures (sheds, garages under 15m²)
- Single-storey buildings with easy access
- Homeowners with construction experience
- Projects where you have 2-3 weekends available
- Situations where Building Regulations approval isn't required
When Professional Installation Is Essential
Professional installation is strongly recommended for:
- Residential properties and habitable rooms
- Roofs over 20m²
- Multi-storey buildings
- Complex roof shapes with multiple penetrations
- Properties where insurance warranties are required
- Projects requiring Building Regulations compliance
- Roofs that function as balconies or terraces
The Hidden Costs of DIY
While DIY materials cost £40-90 per m², the total investment often exceeds expectations:
- Tools and equipment: £200-400 (heat gun, rollers, cutting tools, safety equipment)
- Waste materials: 10-15% extra materials needed for mistakes and cuts
- Time investment: 20-30 hours for a 20m² roof (versus 2-3 days for professionals)
- Rectification costs: Mistakes can cost £1,500-3,000 to fix professionally
Perhaps most importantly, DIY installations typically don't come with insurance-backed guarantees. If problems emerge after installation, you'll bear the full cost of repairs. Professional installations from reputable contractors like Knights Roofing include 15-25 year guarantees, providing long-term peace of mind that far outweighs the initial cost savings.
Types of Flat Roofing Materials
Choosing the right flat roofing material is one of the most important decisions in your installation project. Each material offers different benefits in terms of cost, longevity, installation method, and performance.
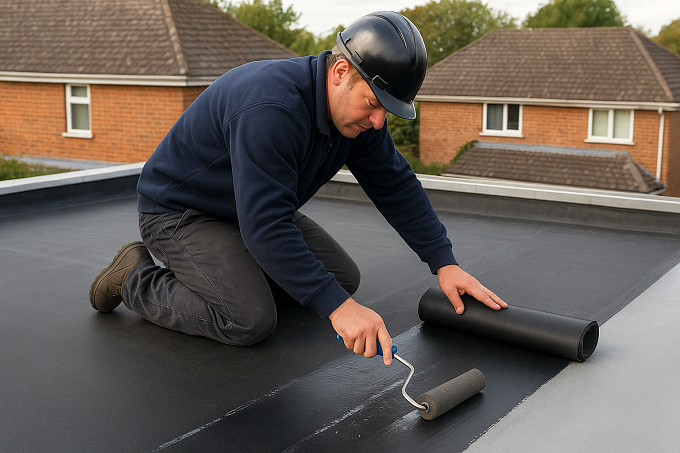
EPDM Rubber Roofing
EPDM (Ethylene Propylene Diene Monomer) rubber has become the most popular flat roofing material in the UK, and for good reason.
Key characteristics:
- Lifespan: 40-50 years with proper installation
- Cost: £50-90 per m² (professional installation)
- DIY materials: £30-50 per m²
- Installation time: 1-2 days (professional), 2-3 weekends (DIY)
- Maintenance: Minimal - annual inspection recommended
EPDM offers exceptional weather resistance, withstanding temperatures from -40°C to +120°C without cracking or splitting. The single-ply membrane construction eliminates multiple layers found in traditional felt systems, reducing potential failure points.
At Knights Roofing, EPDM is our most frequently specified material for residential flat roofs. The combination of durability, cost-effectiveness, and proven performance makes it ideal for London's variable climate. Learn more about EPDM rubber roofing and why it's become the gold standard for flat roofs.
GRP Fibreglass Roofing
GRP (Glass Reinforced Plastic) fibreglass creates a completely seamless, waterproof surface ideal for roofs that also function as balconies or terraces.
Key characteristics:
- Lifespan: 30-40 years
- Cost: £80-130 per m² (professional installation)
- DIY materials: £50-80 per m²
- Installation time: 2-3 days (professional), not recommended for DIY
- Maintenance: Very low - periodic cleaning
GRP installation involves applying catalysed resin to the roof deck and laying fibreglass matting on top. This creates an incredibly strong, seamless surface that's particularly popular for roof terraces where aesthetics and durability are paramount. The hard-wearing finish can withstand foot traffic and furniture without damage.
However, GRP installation requires specific skills and ideal weather conditions (dry, temperatures above 5°C). The resin has a short working time, making it challenging for DIY installers. Professional application ensures proper curing and avoids common issues like pinholes or improper adhesion.
Traditional Felt Roofing
Traditional torch-on felt remains a cost-effective option, though its shorter lifespan means it may not offer the best long-term value.
Key characteristics:
- Lifespan: 15-20 years
- Cost: £40-70 per m² (professional installation)
- DIY materials: £25-40 per m²
- Installation time: 1-2 days (professional), not suitable for DIY
- Maintenance: Moderate - regular inspections needed
Felt roofing involves applying three layers of modified bitumen, heat-welded together using a blowtorch. This creates a waterproof seal, but the multiple layers mean more potential failure points compared to single-ply systems.
Important safety note: Torch-on felt installation is NOT suitable for DIY. The open flame presents significant fire risks, and professional installers carry specialist insurance for hot works. For DIY projects, self-adhesive felt provides a safer alternative, though it offers reduced longevity.
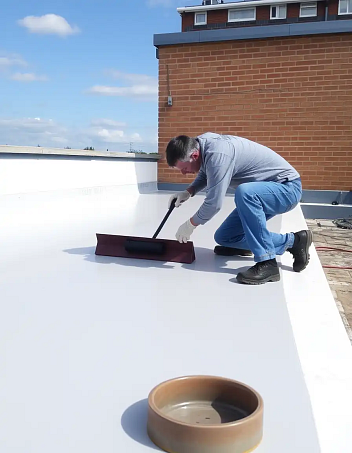
PVC Membrane Roofing
PVC (Polyvinyl Chloride) single-ply membranes are primarily used on commercial buildings but occasionally specified for residential projects requiring specific fire ratings or chemical resistance.
Key characteristics:
- Lifespan: 25-35 years
- Cost: £60-100 per m²
- Installation: Professional only
- Maintenance: Low
PVC membranes offer good performance but are less common in residential applications. For most London homeowners, EPDM or GRP provides better value and more readily available installation expertise.
Professional Flat Roof Installation Process
Understanding the professional installation process helps you appreciate the skill and attention to detail required for a long-lasting flat roof. Here's how Knights Roofing approaches every flat roof installation project.
Step 1: Roof Inspection & Survey (Day 0)
Before any work begins, we conduct a thorough inspection to assess:
- Existing roof structure and joists condition
- Load-bearing capacity for new materials and insulation
- Drainage requirements and fall direction
- Building Regulations requirements
- Access logistics and safety considerations
- Measurements for accurate material ordering
This inspection typically takes 30-60 minutes and allows us to provide an accurate, detailed quotation with no hidden surprises. We'll identify any structural repairs needed before installation can proceed.
Step 2: Substrate Preparation (Day 1)
A flat roof is only as good as its substrate. Professional preparation ensures a stable, dry base for the membrane.
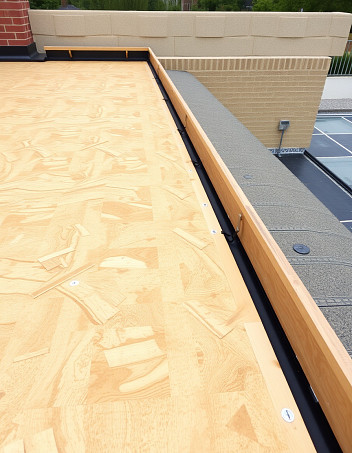
Typical preparation includes:
- Removing existing roofing material (if replacement project)
- Inspecting and repairing roof deck boards (OSB3 or exterior-grade plywood)
- Replacing damaged or rotten decking
- Ensuring proper roof fall (minimum 1:80 gradient for drainage)
- Installing drip battens around perimeter
- Checking all penetrations (vents, pipes) are properly sealed
Poor substrate preparation is the leading cause of premature flat roof failure. Moisture trapped beneath the membrane, uneven surfaces, or inadequate falls lead to ponding water and eventual leaks. Professional roofers identify and rectify these issues before installation.
Step 3: Insulation Installation (Day 1)
Modern Building Regulations (Part L) require adequate thermal insulation for flat roofs. Professional installation ensures compliance and maximises energy efficiency.
Typical insulation options:
- PIR (Polyisocyanurate) boards: Most common, excellent thermal performance, 90-150mm thickness
- Mineral wool: Fire-resistant, good acoustic properties, breathable
- XPS (Extruded Polystyrene): High compressive strength for roofs with foot traffic
Insulation boards are mechanically fixed to the deck using specialist fasteners at calculated centres based on wind load calculations. This "warm roof" construction places insulation above the structural deck, preventing condensation issues common in older "cold roof" designs.
Building Regulations note: Any flat roof replacement or new installation over habitable rooms requires Building Regulations approval. Professional contractors handle this process, ensuring your roof meets thermal performance standards (typically U-value of 0.18 W/m²K or better).
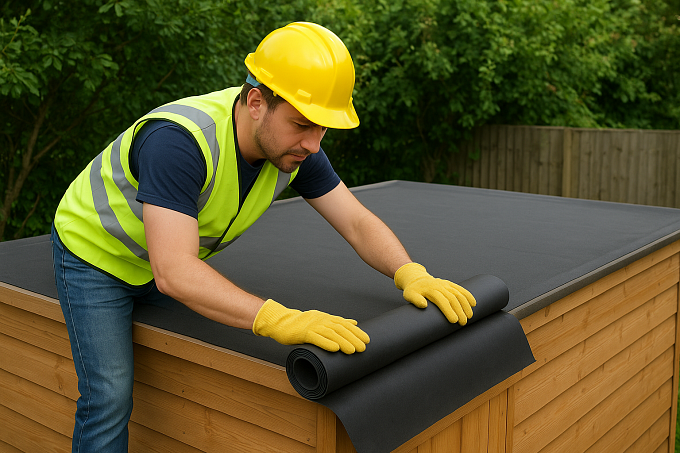
Step 4: Membrane Installation (Day 2)
This is where the waterproof layer is applied. The installation method varies by material:
EPDM rubber installation:
- Membrane is rolled out and positioned, allowing adequate overhang
- Membrane is folded back and contact adhesive applied to deck and membrane underside
- Membrane is carefully re-laid, using rollers to eliminate air bubbles
- Seams are joined using specialist tape or liquid adhesive
- Perimeter edges are secured with termination bars
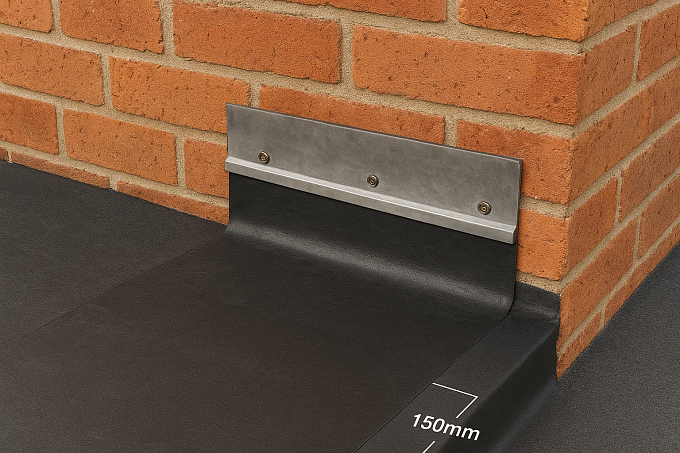
- Membrane is dressed up walls and penetrations (minimum 150mm upstand)
GRP fibreglass installation:
- Resin is mixed with catalyst (time-sensitive process)
- Resin is applied to prepared deck using rollers
- Fibreglass matting is laid into wet resin
- Additional resin layers are applied to fully saturate matting
- Topcoat provides UV protection and colour finish
- Edges and upstands are similarly treated for seamless finish
Professional installers work systematically to avoid trapped air, wrinkles, or inadequate adhesion. They understand how temperature and humidity affect materials and adjust their techniques accordingly.
Step 5: Flashing & Drainage (Day 2)
Proper flashing installation prevents water ingress at vulnerable points where the roof meets walls, penetrations, or parapets.
Critical flashing areas:
- Wall upstands: Membrane dressed minimum 150mm up walls, secured with termination bars, and sealed with cover flashing
- Lead flashing: Traditional lead flashing often used at wall junctions for aesthetics and longevity
- Pipe penetrations: Specialist boots or flashings create watertight seals around vent pipes
- Internal drainage: Outlets positioned at low points with secure, watertight connections
Professional roofers understand that flashing failures are the most common source of leaks. They take extra care to ensure every junction is properly sealed and mechanically secured.
Drainage considerations:
Even "flat" roofs require adequate drainage. A minimum fall of 1:80 (about 12mm per metre) directs water toward gutters or outlets. Professionals calculate required falls during the planning stage and may use tapered insulation or firring strips to create proper drainage paths.
Step 6: Edge Detailing & Trims (Day 2-3)
Professional edge details provide both weatherproofing and aesthetic finish:
- Drip trims: Extend roof beyond fascia, directing water into gutters
- Gravel stops: For ballasted or green roof systems
- Coping stones: Traditional finish for parapet walls
- UPVC trims: Modern, low-maintenance edge details
These details are often overlooked in DIY installations but are crucial for preventing wind uplift and water ingress at roof edges.
Step 7: Final Inspection & Warranty (Day 3)
Before considering a project complete, Knights Roofing conducts a thorough final inspection:
- Visual inspection of entire membrane surface
- Check all seams and flashings
- Verify proper drainage (water test if conditions allow)
- Inspect all penetrations and terminations
- Site cleanup and waste removal
We provide customers with comprehensive documentation including:
- Material specifications and batch numbers
- Installation photographs
- Building Regulations completion certificate (where applicable)
- Manufacturer's warranty documentation (typically 15-25 years)
- Maintenance recommendations and schedule
This documentation is crucial for insurance purposes and future property sales.
DIY Flat Roof Installation Guide
For those determined to attempt DIY installation—typically for small sheds, garages, or outbuildings—here's an overview of the process. However, we strongly recommend professional installation for any habitable structure.
Essential Tools & Materials
Tools required:
- Heavy-duty utility knife with hooked blades
- Measuring tape and chalk line
- Roller (paint-style) for applying adhesive
- Brush for primer application
- Heat gun (for certain materials)
- Safety equipment: harness, hard hat, safety glasses, gloves
- Scaffolding or secure access platform

Materials needed:
- EPDM membrane (order 10-15% extra for overhang and wastage)
- Water-based or contact adhesive (as per manufacturer specifications)
- EPDM primer
- Termination bars and fixings
- Flashing tape or liquid flashing
- Drip trims and edge details
- Sealant for final detailing
Cost estimate for 20m² shed roof:
- EPDM membrane kit: £600-800
- Tools (if not owned): £150-250
- Additional materials: £100-150
- Total: £850-1,200
Compare this to professional installation at £1,200-1,800 for the same shed roof, and the cost difference becomes much smaller when you factor in time, effort, and risk.
DIY Installation Steps (EPDM)
- Prepare the substrate (4-6 hours)
Remove all existing roofing material down to the deck boards. Inspect boards for damage, replacing any rotten or soft areas. Ensure the surface is completely clean, dry, and free from protrusions. Install drip battens around the perimeter.
- Plan the membrane layout (1 hour)
Measure the roof carefully, adding 150mm to each dimension for edge overlap and upstands. For roofs wider than the membrane roll, plan seam locations away from water flow paths.
- Apply primer to upstands (1 hour)
EPDM primer is applied to any vertical surfaces where the membrane will be adhered—walls, parapets, curbs. Allow primer to dry according to manufacturer instructions (typically 30-60 minutes).
- Position the membrane (2 hours)
Unroll the membrane and position it on the roof, ensuring adequate overhang on all sides. Allow the membrane to relax for 30-60 minutes, especially in cooler weather. This prevents shrinkage after installation.
- Apply adhesive (3-4 hours)
Working in sections, fold back half the membrane and apply water-based deck adhesive to both the deck and membrane back. Use a roller for even coverage. Allow adhesive to dry until tacky (typically 10-20 minutes, but check manufacturer instructions).
- Lay the membrane (2-3 hours)
Carefully re-lay the membrane into the wet adhesive, working from the centre outward to eliminate air bubbles. Use a push broom or roller to ensure good contact. Repeat for the other half of the roof.
- Secure edges and upstands (2-3 hours)
Apply contact adhesive to perimeter edges and vertical upstands. Press the membrane firmly into place, using a roller or hand pressure. Install termination bars at the top of upstands (minimum 150mm height), securing with appropriate fixings.
- Apply flashing tape (2-3 hours)
For complex details—external corners, pipe penetrations—use EPDM flashing tape. This stretchable tape bonds to primed EPDM surfaces, creating watertight seals at difficult junctions.
- Install edge trims (2 hours)
Attach drip trims around the perimeter, ensuring the membrane extends into gutters or over the fascia. Seal any remaining exposed edges with contact adhesive and pressure.
- Final inspection (1 hour)
Walk the entire roof surface (carefully, with appropriate fall protection) checking for bubbles, poor adhesion, or unsealed edges. Allow 24-48 hours before exposing to water if possible.
Total DIY time estimate: 20-30 hours (typically spread over 2-3 weekends)
Common DIY Installation Mistakes
Even experienced DIYers frequently make these errors:
- Inadequate substrate preparation Failing to replace damaged decking or remove all old adhesive creates an unstable base for the new membrane.
- Poor adhesive application Applying too much (creating ridges) or too little (inadequate bond) adhesive leads to problems. Following manufacturer instructions precisely is crucial.
- Trapped air bubbles Large air pockets beneath the membrane can cause blistering and premature failure. Proper rolling technique is essential.
- Insufficient upstand height Membrane must extend minimum 150mm up walls. Short upstands are a primary source of leaks.
- Inadequate flashing details Complex junctions require careful attention. DIY installers often underestimate the difficulty of achieving watertight seals at corners and penetrations.
- Working in poor weather Installing adhesives below 5°C or in rain compromises adhesion. Professional installers plan around weather forecasts.
- Incorrect membrane size Measuring errors or failing to account for overhang leaves insufficient material for proper installation.
- Ignoring Building Regulations Many DIYers don't realise that flat roof work over habitable rooms requires Building Regulations approval. Non-compliant installations can cause problems when selling the property or making insurance claims.
The average cost to rectify a failed DIY flat roof installation ranges from £1,500-3,500—significantly more than the initial savings from not hiring professionals.
Flat Roof Installation Costs London 2025
Understanding the full cost picture helps you budget appropriately and compare DIY versus professional installation fairly.
DIY Material Costs
Per square metre:
- EPDM rubber: £30-50/m²
- GRP fibreglass: £50-80/m² (resin, matting, topcoat)
- Self-adhesive felt: £25-40/m²
- Primers, adhesives, trims: £5-10/m²
Example cost for 20m² roof:
- EPDM materials: £700-1,000
- Tools (if buying): £150-250
- Waste/extras (10-15%): £100-150
- Total DIY cost: £950-1,400
Professional Installation Costs
Professional installation includes all materials, labour, waste removal, and guarantees.
Per square metre (complete installation):
- EPDM rubber: £55-90/m²
- GRP fibreglass: £80-130/m²
- Traditional felt: £40-70/m²
- PVC membrane: £60-100/m²
Example cost for 20m² roof:
- EPDM professional: £1,100-1,800
- GRP professional: £1,600-2,600
- Felt professional: £800-1,400
Typical project costs by size:
Roof Size
EPDM
GRP
Felt
10m² (small shed)
£600-900
£900-1,300
£500-700
20m² (garage/extension)
£1,200-1,800
£1,800-2,600
£1,000-1,400
30m² (larger extension)
£1,800-2,700
£2,700-3,900
£1,500-2,100
50m² (substantial project)
£3,000-4,500
£4,500-6,500
£2,500-3,500
Additional Costs to Consider
Structural repairs:
- Rotten deck boards: £30-50/m²
- Joist repairs/replacement: £200-500
- New fascias: £25-40 per linear metre
Building Regulations:
- Application fee: £200-400 (varies by council)
- Structural calculations (if required): £150-400
Insulation upgrades:
- PIR boards 100mm: £15-25/m²
- PIR boards 150mm: £25-35/m²
Access equipment:
- Scaffolding hire (if required): £400-800 for 2-3 weeks
The True Cost Comparison:
For a typical 20m² extension flat roof requiring Building Regulations compliance:
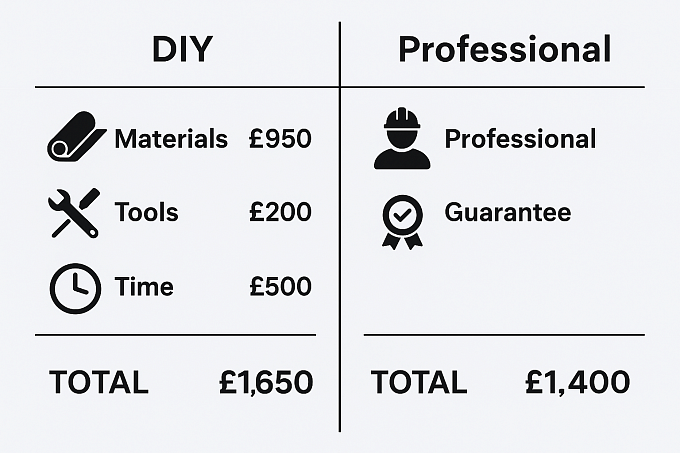
DIY route:
- Materials: £950
- Tools: £200
- Building Regs (DIY application): £300
- Your time (25 hours @ £20/hour opportunity cost): £500
- Total: £1,950
Professional installation:
- Complete installation (EPDM): £1,400
- Building Regs included: £0
- Your time: 0 hours
- Guarantee: 20 years insurance-backed
- Total: £1,400
When you factor in time, risk, and guarantees, professional installation often provides better value—especially for habitable structures where quality and longevity are paramount.
Why Choose Professional Flat Roof Installation
While we've provided information for those considering DIY, there are compelling reasons why most homeowners choose professional installation.
1. Insurance-Backed Guarantees
Professional contractors provide 15-25 year insurance-backed guarantees covering both materials and workmanship. If problems arise during the guarantee period, they're rectified at no cost. DIY installations have no such protection—you bear all risk and repair costs.
At Knights Roofing, our installations include:
- Manufacturer's material warranty (typically 20+ years for EPDM)
- 20-year workmanship guarantee
- Insurance-backed warranty underwritten by independent insurer
- Annual inspection service available
2. Building Regulations Compliance
Any flat roof work over habitable rooms requires Building Regulations approval. Professional contractors:
- Handle all Building Regulations paperwork
- Ensure thermal performance meets current standards
- Provide completion certificates for your records
- Understand structural requirements and wind load calculations
DIY applications require you to navigate the regulations yourself, submit detailed plans, and potentially face inspections. Non-compliant work can cause problems when selling your property or making insurance claims.
3. Proper Tools and Equipment
Professional roofers invest in specialist tools that ensure quality installation:
- Calibrated torque settings for mechanical fasteners
- Professional-grade rollers and application tools
- Heat welding equipment for seams
- Fall protection and safe access equipment
- Moisture meters and testing equipment
These tools would cost £2,000-5,000 to purchase—far exceeding any DIY savings for a single project.
4. Experience and Problem-Solving
Every roof presents unique challenges. Professional roofers have seen countless installations and know how to handle:
- Complex roof shapes and penetrations
- Poor existing structures requiring repair
- Drainage issues and proper fall calculations
- Weather-related installation challenges
- Integration with existing building elements
This experience is invaluable. A mistake that seems minor during installation can lead to catastrophic failure months or years later. Professionals know where problems typically occur and take preventative measures.
5. Speed and Efficiency
What takes an experienced DIYer 2-3 weekends (20-30 hours of labour), professional teams complete in 2-3 days. This means:
- Less disruption to your property
- Reduced exposure to weather during installation
- Faster return to normal use
- Less stress and physical demands
For residential properties, minimising the time your home is exposed to the elements is crucial. Professional teams can work quickly without sacrificing quality.
6. Material Warranties
Many manufacturers only honour material warranties when installation is performed by certified installers. DIY installation may void warranties, leaving you with no recourse if material defects emerge.
Knights Roofing is certified with major manufacturers including Firestone (EPDM), ensuring our customers receive full warranty protection.
7. Long-Term Value
A professionally installed flat roof typically lasts 40-50 years (EPDM) or 30-40 years (GRP) with minimal maintenance. DIY installations often fail prematurely due to installation errors, requiring costly repairs or complete replacement within 10-15 years.
The £500-800 premium for professional installation pays for itself many times over through:
- Extended lifespan
- Reduced maintenance and repair costs
- Higher property value
- Better energy efficiency
- Peace of mind
Flat Roof Installation: Making Your Decision
Flat roof installation is a significant investment in your property. While DIY approaches can work for simple, small structures like sheds or garages, most homeowners find that professional installation offers superior value for residential buildings.
When to Go Professional (Recommended)
Choose professional installation for:
- Any habitable building (homes, extensions with rooms beneath)
- Roofs over 20m²
- Multi-storey buildings
- Complex roof shapes or multiple penetrations
- Projects where Building Regulations apply
- Roofs functioning as balconies or terraces
- When you need insurance-backed guarantees
- Commercial or rental properties
When DIY Might Be Appropriate
Consider DIY only for:
- Small sheds or garden buildings (under 15m²)
- Single-storey, simple rectangular roofs with easy access
- Projects where you have relevant construction experience
- Situations where you have 2-3 weekends available
- When Building Regulations don't apply
Questions to Ask Potential Contractors
If choosing professional installation, ensure your contractor meets these standards:
Essential questions:
- Are you properly insured? (Public liability minimum £5 million, employers' liability £10 million)
- Can you provide recent references and photos of completed projects?
- What guarantee do you offer? (Look for 15-25 years insurance-backed)
- Are you certified with material manufacturers? (Firestone, Resitrix, etc.)
- How do you handle Building Regulations? (Should be included in quotation)
- What's included in your quotation? (Materials, labour, waste removal, Building Regs)
- What's your timeline? (Professional teams work efficiently: 2-3 days for typical residential roof)
- How do you handle adverse weather during installation?
Red flags to avoid:
- Cash-only payments or requests for full payment upfront
- No written quotation or contract
- Unable to provide insurance certificates
- Unwilling to provide references
- Pressure tactics or time-limited "special offers"
- Quotations significantly below market rates
- No guarantees or warranties offered
Maintaining Your Flat Roof After Installation
Proper maintenance extends your flat roof's lifespan and prevents minor issues from becoming expensive problems.
Annual Inspection Checklist
Conduct visual inspections twice yearly (spring and autumn) and after severe weather:
Check for:
- Ponding water (standing water more than 48 hours after rain)
- Cracks, splits, or tears in membrane
- Blistering or bubbling
- Loose or damaged flashing
- Debris accumulation (leaves, moss)
- Blocked drainage outlets or gutters
- Penetration seals (vents, pipes)
- Edge details and termination bars
Professional inspections every 3-5 years catch issues early. Knights Roofing offers annual inspection services for peace of mind.
Simple Maintenance Tasks
Tasks you can safely perform:
- Debris removal: Clear leaves and branches using a soft broom (avoid sharp tools)
- Gutter cleaning: Keep gutters and downpipes clear for proper drainage
- Drain clearance: Ensure drainage outlets aren't blocked
- Visual checks: Look for obvious damage after storms
Tasks requiring professionals:
- Repairing cracks or splits
- Replacing damaged flashing
- Addressing ponding water issues
- Membrane patching or seam repairs
Signs Your Roof Needs Professional Attention
Contact a roofing professional immediately if you notice:
- Water stains on ceilings below
- Persistent ponding water (48+ hours after rain)
- Visible cracks or tears in membrane
- Blistering or bubbling across large areas
- Moss or plant growth on roof surface
- Damaged or missing flashing
- Interior condensation or damp
Early intervention prevents minor issues from requiring expensive repairs or premature replacement.
Conclusion
Flat roof installation is a skilled trade that requires careful planning, quality materials, and proper execution. While DIY installation is technically possible for small, simple structures, most homeowners find that professional installation offers superior value through guaranteed workmanship, Building Regulations compliance, and long-term peace of mind.
At Knights Roofing, we've spent over 20 years perfecting flat roof installations across South West London. Our certified installers understand the unique challenges of London's climate and building stock, delivering flat roofs that provide decades of reliable performance.
Whether you're building an extension, replacing an aging roof, or adding a new structure to your property, we're here to help with expert advice, transparent quotations, and guaranteed quality workmanship.
Ready to Discuss Your Flat Roof Project?
Contact Knights Roofing today for:
- Free, no-obligation site survey
- Detailed written quotation
- Expert material recommendations
- Building Regulations guidance
- 20-year insurance-backed guarantee
Call us: [Phone Number]
Email: [Email Address]
Service areas: Battersea, Wandsworth, Clapham, Putney, Wimbledon, Richmond, Barnes, Fulham, Chelsea, Kensington, and all South West London
Explore our other flat roofing resources:
- EPDM Rubber Roofing Guide
- Flat Roof Repair & Replacement Costs
- Flat Roof Leak Solutions
- Professional Flat Roofing Services
Frequently Asked Questions
How long does flat roof installation take?
Professional installation typically takes 2-3 days for a standard residential flat roof (20-30m²). DIY installations usually require 2-3 weekends (20-30 hours of labour). Timeline depends on roof size, complexity, weather conditions, and whether structural repairs are needed. Larger or more complex roofs may take 4-5 days.
Do I need Building Regulations approval for flat roof installation?
Yes, if you're installing or replacing a flat roof over habitable rooms (living spaces, bedrooms, etc.). Building Regulations ensure adequate thermal performance, structural integrity, and fire safety. Exemptions may apply for small outbuildings, sheds, or garages not attached to the main house. Professional contractors handle Building Regulations applications and provide completion certificates.
What's the best material for a flat roof in London?
EPDM rubber roofing is generally the best choice for London properties, offering 40-50 year lifespan, excellent weather resistance, and good value at £55-90/m² installed. GRP fibreglass (£80-130/m²) is ideal for roofs also used as balconies or terraces. Traditional felt (£40-70/m²) is the most economical but offers shorter lifespan (15-20 years). Your specific requirements determine the optimal material.
Can I install a flat roof myself?
DIY installation is possible for small, simple structures (sheds, garages) if you have construction experience and appropriate tools. However, professional installation is strongly recommended for habitable buildings, roofs over 20m², or complex designs. DIY mistakes often cost more to rectify (£1,500-3,500) than the initial savings. Professional installations include guarantees, Building Regulations compliance, and proper insurance coverage that DIY cannot match.
How much does flat roof installation cost in London?
Professional flat roof installation costs £55-130/m² depending on material choice. For a typical 20m² extension: EPDM costs £1,200-1,800, GRP costs £1,800-2,600, and traditional felt costs £1,000-1,400. DIY material costs are £30-90/m², but you must add tools, your time, and risk of costly mistakes. See our detailed cost guide for comprehensive pricing.
What is the minimum fall required for a flat roof?
The minimum fall (gradient) for a flat roof is 1:80 according to British Standards (BS 6229:2018), which equates to approximately 12mm per metre. This allows water to drain to gutters or outlets rather than ponding. Some installers use 1:40 for improved drainage. Proper fall design is crucial—it's one area where DIY installations frequently fail, leading to standing water and premature roof failure.
How long do flat roofs last?
Lifespan varies by material: EPDM rubber (40-50 years), GRP fibreglass (30-40 years), traditional felt (15-20 years), and PVC membrane (25-35 years). Professional installation and regular maintenance significantly extend these lifespans. DIY installations often fail prematurely (10-15 years) due to installation errors. At Knights Roofing, our professionally installed EPDM roofs routinely exceed 40 years with minimal maintenance.
Can a flat roof be used as a balcony or terrace?
Yes, but this requires specific design considerations. GRP fibreglass is typically the best material for roof terraces, offering a hard-wearing, slip-resistant surface. The roof structure must be designed for additional live loads (people, furniture). Appropriate railings, drainage, and waterproofing details are essential. Building Regulations apply, and professional design and installation are mandatory for safety and structural integrity.
What causes flat roofs to leak?
Common causes include ponding water (inadequate drainage), damaged or deteriorated membranes, failed flashing at walls and penetrations, poor installation quality, and inadequate maintenance. Most leaks occur at junctions, penetrations, and edge details rather than the main membrane surface. Professional installation with proper attention to flashing details significantly reduces leak risk. Regular inspections catch minor issues before they become major problems.
Do flat roofs need insulation?
Yes. Building Regulations (Part L) require adequate insulation for flat roofs—typically achieving U-value of 0.18 W/m²K or better. Modern "warm roof" construction places insulation (usually 100-150mm PIR boards) above the structural deck, preventing condensation problems. Proper insulation improves energy efficiency, reduces heating costs, and prevents internal condensation. DIY installers often overlook or inadequately install insulation, failing Building Regulations and causing long-term problems.
Book Your Flat Roof Installation
Ready for a professional flat roof installation? Our team serves Southwest London including Battersea, Clapham, Chelsea, Wimbledon and Putney. Most installations complete in 1-3 days with minimal disruption.
Typical costs: £1,200-£5,000 depending on size and material. View detailed pricing or request your free quote.